-
Broke Coil screw. What options do I have? How bad to run without?
Yes it was the rearmost on driver side of course. Thread was so so and my friend tightened wrong last time. Started changing plugs today and it broke off. It looks like impossible to do anything there. What options do I have? In theory it should stay in place under most conditions. Anyone had this problem? Also any tip on taking coil screw on next one in front of that one? I have done this before years ago and I forgot. As you can see I am not having a happy day today. Tks
-
-
Junior Boost Lover
Name: Sean

Can you get some good pics of it?
-
-
Not sure a picture is necessary. Each coil pack is held by a screw. One broke off at base. If you have changed plugs you know where is the rearmost on driver side (under cowl). Will coil pack pop up if not held?
-
-
Registered User
Name:

Pics are always necessary.
Your sub box design will always be tops in my book
-
The Following User Liked BlairTruck For This Useful Post:
-
Vader's Chauffer
Name: Ryan

So it broke off flush at the intake?
No you don't have to have it. If it's not flush you can get it out. Ask me how I know
 Sold my 2002 BLK #9638 to my wife's uncle, Sold my 2003 BLK #6682 to a nameless man local to me.
-
-
Thakns Blair ;-)
SoCal Waite, Yes flush. Will get picture tomorrow. Gotta go to TG dinner. Spent 1.5hrs and just got out the two easiest plugs 
-
-
Registered User
Name: Rich

If your feeling ambishush, you could pull the blower, and whole lower intake assembly off to fix it. Or you could just leave it like it is. I would stick something in between the fuel rail and cop to keep it down though, just to be on the safe side.
-
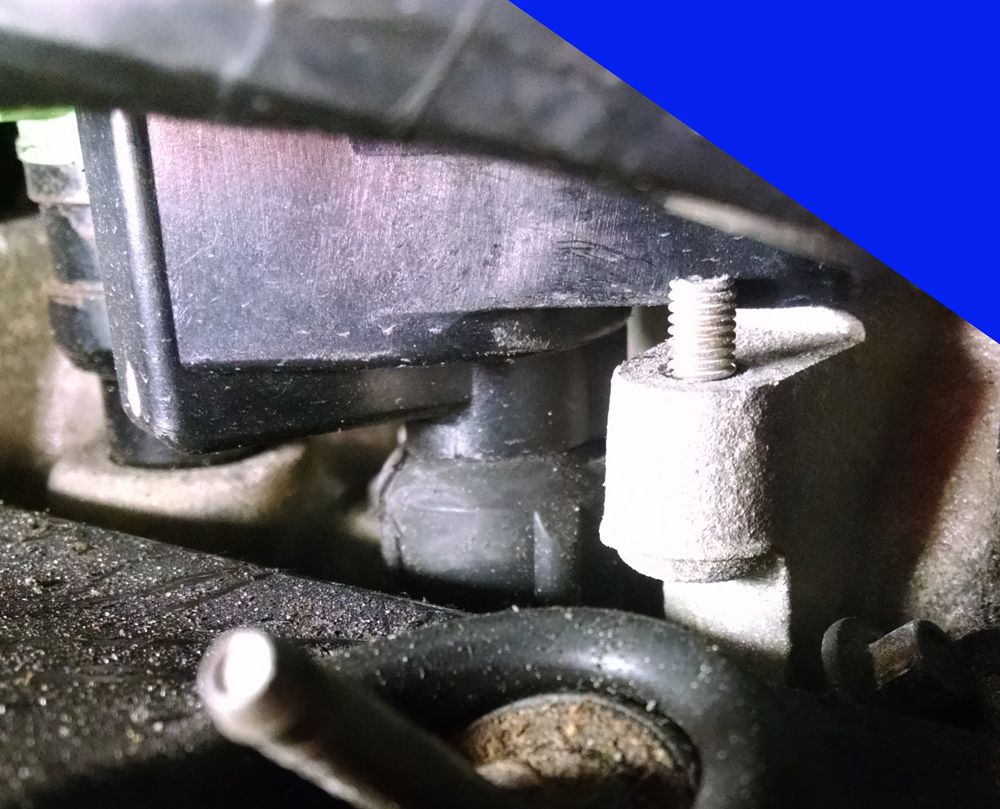
Finished the passenger side. Now started the driver side and have been working for 1/2hr on the rearmost and I am going nowhere. Very frustrated. Any trick on that one? I can't even take the coil off  This is how the broken screw look.

-
-
Registered User
Name: Keith

PB Blaster, let it soak good. Then try to get at it. Just my 2Cent.
-
-
*SOLD - but not forgotten
Name: Chuck NHTOC #291

That's not what I was picturing when you said it was broke off flush. 
After the PB Blaster soaks for awhile, it looks like you should be able to get a vise grip pliers on that to unscrew it pretty easily. 
 Mods=L&S Oil Sep, Blackwood trim & mirror caps, Navi ant' base, E-brake pedal, CAI, C&L Intake & Plenum, 95mm MAF tube, SBTB, 170 T-Stat, Predator+RWTD custom tune, 8# lower, PG Ti900.7 amp, JLA XR570-CXi & Stealthbox, FTVB, Finned Trans Pan, Line of Fire LED, J-Jent Grille, RotorPro Dimpled & Slotted rotors, LED taillights, chrome door strikes, billet locks & coat hangers, ChickenEars Engine Billet package #1&2+door sills, Metco billet aux idler bracket & pulleys, LFP E-Fan, Xenarc HID heads, clear corners, Roush HID fogs, Bedrug, L' 3rd, Kenwood DDX-7017 DVD+TV+Sirrius+RevCam, Lotek dual pillar pod with AutoMeter boost gauge & DynoJet WBC, fog switch mod, UPR billet window switches and door locks, FAST overlays, LFP 58" bars, Hotchkis TVS, Bilsteins, DblG Panhard, Cervinis Cobra R hood, BFG T/A KDW 2 tires, Hawk Ceramic pads, MGP caliper covers.
-
-
Vader's Chauffer
Name: Ryan

Yeah, deff not flush. Take a very small socket, like 4 or 4.5 MM I think, and tap it down over the threads with a hammer, it should seat itself enough that you can put a ratchet on there and pop it loose to get it out.
It worked for me when I did it.
-
-
Yeah sorry. I though it was flush as I haven't seen the bottom. It was the head. I left it there and will fix next time I remove the SC to clean. Spent 5hrs doing the plugs (most of it swearing and wishing bad stuff to Ford designers) so I was not going to spend a second more. Thanks to all ;)
-
The Following 2 Users LIked HD4mula For This Useful Post:
harleyhank (11-28-2014),
SoCal Waite (11-28-2014)
-
Registered User
Name: Rich

Go on lr and search for mad screws. There is a guy who is continuing to make them.
-
-
Registered User
Name:

Use vice grips with increasing pressure. Don't just pull as hard as you can out of the gate.
-
-
Vader's Chauffer
Name: Ryan

I think with where this one's located the small socket us the only option. It was my only option in the driver side front #1 broken screw. Not a terrible amount of room in there.
-
 Posting Permissions
- You may not post new threads
- You may not post replies
- You may not post attachments
- You may not edit your posts
-
Forum Rules


 Reply With Quote


